Getting Started with Outreach
This Outreach training will provide insights on the basic understanding of the tool and serve as a guide to help you get set up and navigate it for a better experience.
What you'll find in the training:
- Terminology: Basic terms used in Outreach to familiarize yourself with.
- Log-in: Log in to get started.
- Basic Setup: Log in and Install extensions, sync calendars, and enable Taskflow.
- Navigation: Use dashboards, manage data, and customize views.
- Troubleshooting: Fix common Chrome and extension issues.
🔎 For more information and help, please contact [enter expert name + contact] or reach out to support.
Login and Install the Extension
Log in to Outreach
[Edit this section to match your organizations' login flow]
- Go to the Outreach login page.
- Enter your registered email address.
- Type your password.
- Click the Login button.
- If you have forgotten your password, click on the Forgot Password? link to reset it.
Logging in to Outreach as a first-time user
- Since you're logging into Outreach for
the first time you will see a configuration wizard that looks like this:
- Next, select the sign-in option that your organization uses with Outreach and enter your login and password.
- If your organization uses Exchange or Office 365, you may need to check with your administrator to confirm the latest endpoint.
- Logging in here will sync Outreach with your email and calendar.
- Follow through the configurations to set up the following:
- your email signature
- your calendar (personalizations)
- The Wizard will prompt you to install the Outreach Everywhere, Chrome extension.
Install the Outreach Everywhere Chrome Extension
To install the Outreach Everywhere Chrome Extension:
- Click here.
- Click Add to Chrome, and then click Add extension in the pop-up.
- Outreach Everywhere has been installed.
⭐ Pro Tip: Pin the extension to your Chrome toolbar to launch on a single click.
⭐ Pro Tip: Enable the Window Mode and Universal Task Flow settings to maximize the tool's functionality.
Basic Terminology
Basic Setup
Email Integration:
To connect your primary email account to Outreach:
- Click your user initials in the bottom left of the navigation sidebar.
- Click Personal Settings.
- Under Mailboxes, click on the mailbox to connect.
- From the Email Provider dropdown menu, select the applicable email provider.
- Click Connect.
- Add your Email Signature.
- Click Save. The email address and provider are now connected.
⭐Pro Tip: Enable the toggles for sending emails and syncing emails so Outreach can send and sync with your email account.
Calendar Integration:
To connect your calendar to Outreach:
- Click your user initials in the bottom left of the navigation sidebar.
- Click Personal Settings.
- Under the Meetings section, select Connect your Calendar.
- Choose the appropriate calendar provider:
- Google Calendar
- Office 365 Calendar
- Exchange Calendar
- Enter your credentials and configure any other relevant calendar setup options, including:
- Public calendar link - a unique link that prospects will use to schedule meetings with you by default.
- Video conferencing - provide your web conferencing URL link for meetings and a description/details for joining.
- Timezone - ensure that your local timezone is correct.
- Availability - specify for working hours.
- Meeting notice and buffer - add restrictions to prevent bookings without sufficient notice, along with a meeting buffer to avoid back-to-back bookings.
- Click Save to complete the process.
Outreach Kaia: Scheduling and Joining Outreach Meetings:
Kaia for voice calls is exclusively available on the Outreach Voice platform. Once set up, Kaia automatically supports all calls recorded in Outreach Voice, adhering to your recording settings:
- If auto-recording is enabled, Kaia will join automatically.
- If consent is required, Kaia will join after consent is given and recording begins.
When Outreach is synced with an approved provider calendar (e.g., Google, Outlook, Exchange, or O365) and Kaia is properly set up, all meetings scheduled through the Outreach Calendar or the synced calendar are automatically enabled for Outreach Kaia, provided the following conditions are met:
- The meeting must be scheduled with a Prospect in the Outreach platform.
- The calendar invite must include a meeting link in either the location or description field.
- Platform-Specific Link:
- If your organization uses Zoom-connected Kaia, the link must be a Zoom link.
- If your organization uses Teams-connected Kaia, the link must be a Microsoft Teams link.
Enable Universal Taskflow:
Universal Taskflow enables efficient task execution by opening a new tab with your chosen landing page, allowing seamless switching between Outreach, Salesforce, and LinkedIn profiles for a prospect. This leads to enhanced productivity in Outreach Everywhere.
📝 Note: Confirm you have the latest version of the Outreach Everywhere Chrome Extension installed prior to going into setting.
To enable and use the Universal Taskflow:
- Click your user initials in the bottom left of the navigation sidebar.
- Click Personal Settings.
- Select Outreach Everywhere Settings.
- Click on the checkbox for Open Outreach Everywhere in a separate window to enable Window Mode.
- Click on the checkbox to enable Universal Taskflow.
Basic Navigation
Home Page Navigation (360 View):
When you navigate to the home page you will see the 360 View:
Prospects in Outreach:
Prospects in Outreach represent an individual within an account, serving as a key point of contact for engagement and communication.
⭐Pro Tip: Use the search bar or Add Filter to search/filter prospects. To sort, click Sort by, choose an option, and select Save View to reuse it later.
Accounts in Outreach:
Accounts in Outreach represent a company or organization, serving as a central hub for managing related Opportunities, activities, and interactions.
⭐Pro Tip: Use the search bar or Add Filter to search/filter an opportunity. To sort, click Sort by, choose an option, and select Save View to reuse it later.
Opportunities in Outreach:
Opportunities in Outreach enable users to manage and track the entire sales pipeline, fostering meaningful engagement and allowing for revenue attribution down to the activity level.
⭐Pro Tip: Use the search bar or Add Filter to search/filter an account. To sort, click Sort by, choose an option, and select Save View to reuse it later.
Troubleshooting Common Extension Issues
If you're facing issues with Outreach Everywhere, follow these troubleshooting steps to resolve them.
📝 Notes:
- Ensure Outreach Everywhere is installed.
- The extension supports only specific versions of the Google Chrome browser.
- Enable the extension in Incognito Mode for this process.
- Save and close any important work before starting, as system restarts and browser updates may be required.
- Confirm that your network environment and bandwidth are stable.
- Outreach does not support third-party, non-Outreach extensions.
Troubleshooting Steps:
- Check the Outreach Everywhere Extension
- Click the Outreach Everywhere icon.
- If the extension loads, proceed to Step 4.
- If it doesn’t load, restart Chrome and proceed to Step 2.
-
- Check Google Chrome Version
- If Chrome is up to date, proceed to Step 4.
- If Chrome is outdated, update it and proceed to Step 3.
-
- Test the Outreach Everywhere Extension Again
- Click the Outreach Everywhere icon.
- If the extension loads, 🎉 you’ve fixed it! 🎉
- If not, go to Step 4.
-
- Access Incognito Mode
- Open Chrome in Incognito Mode.
- Click the Outreach Everywhere icon.
- If the extension loads, proceed to Step 6.
- If it doesn’t load, contact Outreach Support at support@outreach.io.
📝 Note: Include all completed troubleshooting steps in your ticket. -
- Clear Browser Cache
- Clear your Chrome cache.
- Restart Chrome and continue in normal mode.
-
- Final Test in Normal Mode
- Click the Outreach Everywhere icon.
- If the extension loads, 🎉 you’ve fixed it! 🎉
- If not, contact Outreach Support at support@outreach.io.
Need Expert Assistance?
Have further questions or need additional assistance?
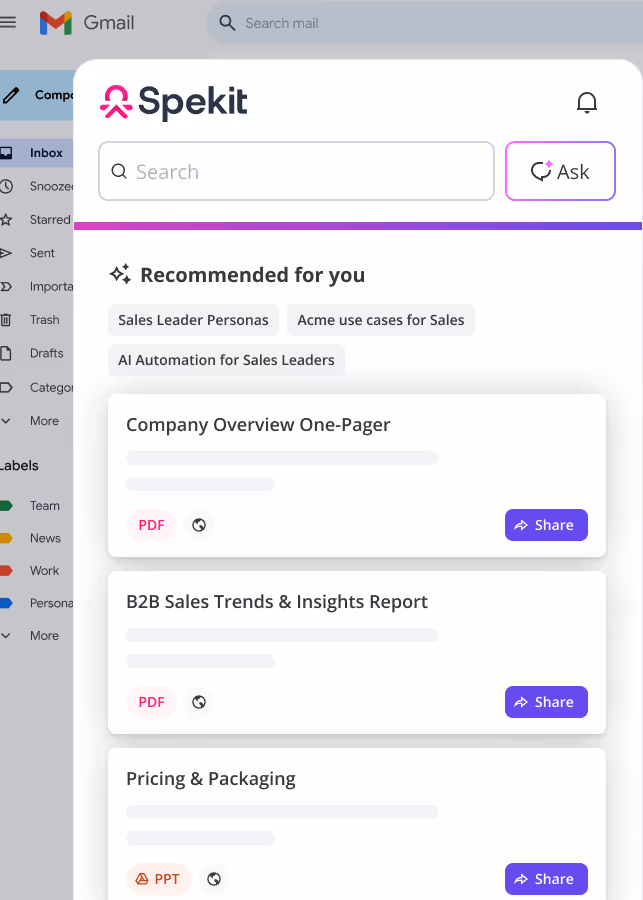
Search for Content with Spekit
Search Spekit to easily find and access learning content and resources directly within your workflow without any interruptions
Open the Spekit Chrome Extension and type in keywords, terms, or processes into the Search bar. Select the desired result to view its details.
💡 ProTip: Turn your searches into AI Sidekick magic, just click into the search bar, type your keyword, and hit Ask to activate the Sidekick.
💡 Pro-Tips: View the content side by side by using the expand feature in the Chrome extension.
Spekit AI Sidekick in Outreach
Spekit AI Sidekick is your personalized, just-in-time enablement assistant, ready to help in critical moments. It delivers real-time answers, tailored content recommendations, coaching, and support directly within your workflow, helping you better understand calls and drive revenue with confidence.
- Get instant help without leaving Outreach.
- Ask questions in plain language and get answers from your org’s knowledge, playbooks, or Speks.
- AI suggests next best actions, key insights, and prospecting ideas based on who or what you’re viewing.
- No more switching tabs, relevant information appears exactly when and where you need it.
- Spekit AI Sidekick understands your view and delivers tailored help for accounts, leads, and connections.
Access Spekit AI Sidekick:
✅ From the Sidebar
✅ Using keyboard shortcuts
Sidebar
- Open the the Sidebar to access AI Sidekick by default.
- Alternatively, click the Ask button beside the search bar.
Keyboard shortcut
- Windows: Press Ctrl + Shift + K
- Mac: Press Cmd + Shift + K
🖌️ To use Spekit AI Sidekick:
- Access the AI sidekick from the Chrome extension or using a keyboard shortcut.
- Type in your question in the input field and press Enter.
- Spekit AI will give you a relevant answer along with resources and suggested follow-up questions.
- Explore further by:
- Clicking on the suggested source materials
- Asking follow-up questions
- Selecting a recommended follow-up question.
💡 Pro Tips:
- Use full sentences for accurate results.
- Use specific, call-related questions for best results.
- Ask follow-ups to dive deeper into deal risks, rep performance, or competitor mentions.
- Combine with Outreach insights to prep for prospecting, personalize messages, or qualify leads quickly.